
Arduino Control Car
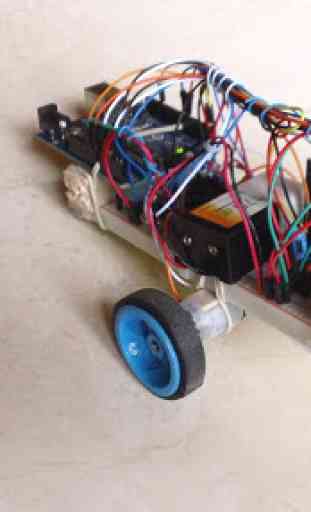
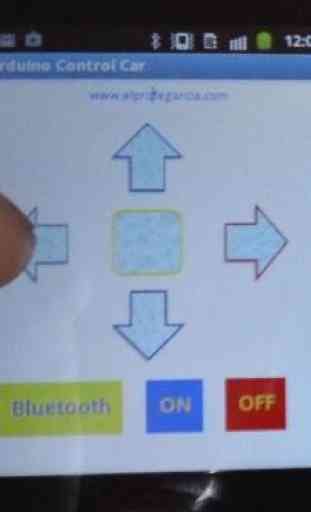
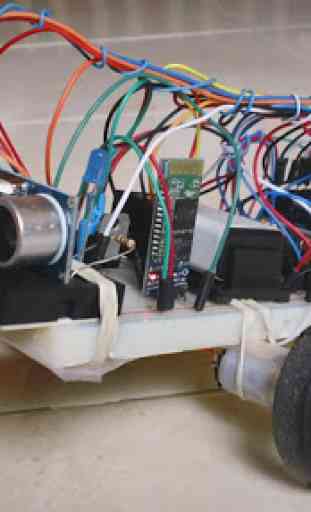
Controlar por Bluetooth el Arduino para aplicaciones como Carros, Brazos acrobáticos, Mandos a distancia, Automatizacion, etc...Que envía esta App por el modulo Bluetooth:Flecha Arriba = Caracter 'a'Flecha Izquierda = Caracter 'b'Boton Cuadrado = Caracter 'c'Flecha Derecha = Caracter 'd'Flecha Abajo = Caracter 'e'Boton ON = Caracter 'f'Boton OFF = Caracter 'g'Boton Bluetooth = Es para seleccionar el Modulo Bluetooth a que se va a conectar (El modulo bluetooth debe estar previamente sincronizado con su telefono AndroidPara realizar Pruebas conecte LEDs a los puertos PWM 5, 6, 9, 10 del Arduino, en el proyecto final a esos puertos se conecta el puente H, Cargue al Arduino el siguiente codigo:int izqA = 5; int izqB = 6; int derA = 9; int derB = 10; int vel = 255; // Velocidad de los motores (0-255)int estado = 'g'; // inicia detenidovoid setup() { Serial.begin(9600); // inicia el puerto serial para comunicacion con el Bluetooth pinMode(derA, OUTPUT); pinMode(derB, OUTPUT); pinMode(izqA, OUTPUT); pinMode(izqB, OUTPUT); } void loop() { if(Serial.available()>0){ // lee el bluetooth y almacena en estado estado = Serial.read(); } if(estado=='a'){ // Boton desplazar al Frente analogWrite(derB, 0); analogWrite(izqB, 0); analogWrite(derA, vel); analogWrite(izqA, vel); } if(estado=='b'){ // Boton IZQ analogWrite(derB, 0); analogWrite(izqB, 0); analogWrite(derA, 0); analogWrite(izqA, vel); } if(estado=='c'){ // Boton Parar analogWrite(derB, 0); analogWrite(izqB, 0); analogWrite(derA, 0); analogWrite(izqA, 0); } if(estado=='d'){ // Boton DER analogWrite(derB, 0); analogWrite(izqB, 0); analogWrite(izqA, 0); analogWrite(derA, vel); } if(estado=='e'){ // Boton Reversa analogWrite(derA, 0); analogWrite(izqA, 0); analogWrite(derB, vel); analogWrite(izqB, vel); } if (estado =='f'){ // Boton ON se mueve sensando distancia } if (estado=='g'){ // Boton OFF, detiene los motores no hace nada }} Bluetooth controlled by the Arduino for applications such as cars, acrobatic Brazos, Remote control, automation, etc ...Sending this app by the Bluetooth module:Up Arrow = Character 'a'Left Arrow = Character 'b'Square Button = Character 'c'Right Arrow = Character 'd'Down Arrow = Character 'e'Pin ON = Character 'f'Pin OFF = Character 'g'Pin Bluetooth = is to select the Bluetooth module to which you are connecting(The bluetooth module must first be synchronized with your Android phoneTRY To connect LEDs to the PWM 5, 6, 9, 10 Arduino ports, in the final draft to those ports the H bridge is connected to the Arduino Load the following code: izqA int = 5;izqB int = 6;Dera int = 9;Derb int = 10;vel int = 255; // Speed engines (0-255)int status = 'g'; // Starts arrestedvoid setup () { Serial.begin (9600); // Start the serial port for communication with Bluetooth pinMode (DERA, OUTPUT); pinMode (Derb, OUTPUT); pinMode (izqA, OUTPUT); pinMode (izqB, OUTPUT); } void loop () { if (Serial.available ()> 0) {// read the bluetooth and stored in state status = Serial.read (); } if (state == 'a') {// move the Front Button analogWrite (Derb, 0); analogWrite (izqB, 0); analogWrite (DERA, vel); analogWrite (izqA, vel); } if (state == 'b') {// Button LEFT analogWrite (Derb, 0); analogWrite (izqB, 0); analogWrite (DERA, 0); analogWrite (izqA, vel); } if (state == 'c') {// Stop Button analogWrite (Derb, 0); analogWrite (izqB, 0); analogWrite (DERA, 0); analogWrite (izqA, 0); } if (state == 'd') {// Button DER analogWrite (Derb, 0); analogWrite (izqB, 0); analogWrite (izqA, 0); analogWrite (DERA, vel); } if (state == 'e') {// Reverse Button analogWrite (DERA, 0); analogWrite (izqA, 0); analogWrite (Derb, vel); analogWrite (izqB, vel); } if (state == 'f') {// Button ON by sensing distance moves } if (state == 'g') {// Button OFF, stops the engine does nothing }}
Que envía esta App por el modulo Bluetooth:Flecha Arriba = Caracter 'a'Flecha Izquierda = Caracter 'b'Boton Cuadrado = Caracter 'c'Flecha Derecha = Caracter 'd'Flecha Abajo = Caracter 'e'Boton ON = Caracter 'f'Boton OFF = Caracter 'g'Boton Bluetooth = Es para seleccionar el Modulo Bluetooth a que se va a conectar (El modulo bluetooth debe estar previamente sincronizado con su telefono Android
Para realizar Pruebas conecte LEDs a los puertos PWM 5, 6, 9, 10 del Arduino, en el proyecto final a esos puertos se conecta el puente H, Cargue al Arduino el siguiente codigo:int izqA = 5; int izqB = 6; int derA = 9; int derB = 10; int vel = 255; // Velocidad de los motores (0-255)int e
Category : Communication
Related searches
Reviews (9)
sur. k.
Jan 1, 2020
Get a chance to engine and miss the above subject 😂😔😔😔😔😔😔😂😔😉😂 the
Run. P.
Oct 9, 2019
I think it is very important for us
Has. A.
Jul 25, 2016
Error message not connected to a Bluetooth device takes a lot of time to go away. Decrease this time. Also the error message keeps showing even when app is closed. It's kinda annoying
Naz. F.
Mar 9, 2016
Muy functional
Nav.
Jul 20, 2017
Can't connect to hc-06 Bluetooth module. The light dosent blink when it connects
Dev.
Aug 8, 2017
This app is useful and programmed
Lui. M. B. H.
Jan 27, 2017
It is a great app to control arduino through Bluetooth
san. d. l. f. m. r.
Oct 31, 2017
the app is cool i think
good app, thank youuuuuuu