NodeMCU ESP8266 WiFi Automação
IOT Internet Of Things
The Internet of Things is a technological revolution in order to connect electronic devices used in everyday life (such as electrical appliances, kitchen appliances, industrial machinery, transport means, etc.) to the Internet.
Automation control up to 9 channels for drive modules with relays, so we can control ON / OFF devices connected to mains 110V / 220V.
Allows WiFi connection between multiple simultaneous cell; View all operations performed by other cell (connected to the WiFi network that have the APP "ssid" and "password".) In real time, family use:
downloads:
Code: NodeMCU ESP8266 WiFi IOT Automation
https://www.dropbox.com/home/NodeMCU%20ESP8266%20WiFi
% 20IOT% 20Automation
Arduino Home
https://www.arduino.cc/
Librari: ESP8266WiFi
https://www.dropbox.com/home/ESP8266WiFi
Driver: CH340G
http://www.arduined.eu/tag/ch340g/
Blog: http://sergioarduino.blogspot.com.br/p/nodemcu-esp8266.html
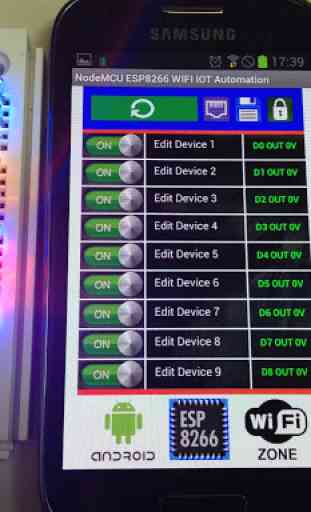
App description. NodeMCU ESP8266 WiFi IOT Automation
ON / OFF control 110 / 220V up to 9 (nine) editable devices:
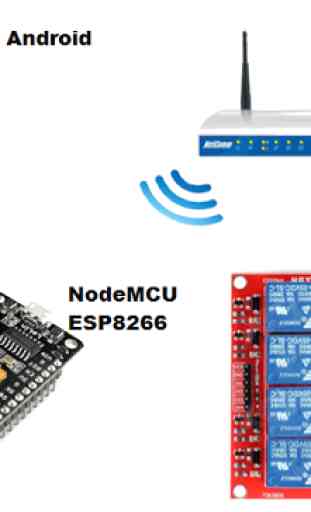
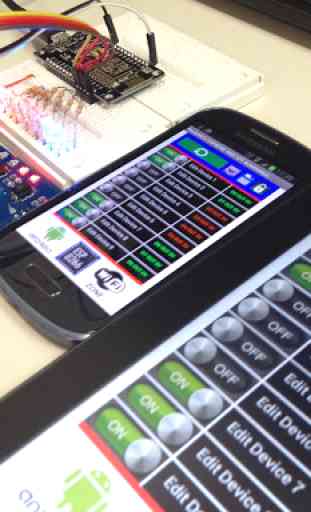
Through the smartphone Android with App. Installed, we can make the connection via WiFi with NodeMCU ESP8266 which in turn is connected to WiFi Router.
BUTTON - SWITCHES MODE:
- 9 keys control ON / OFF Mode Relay 110 / 220V;
- 9 Editable devices;
- 9 Status of IO ESP8266 doors;
BUTTON LOCK / UNLOCK:
Lock / unlock Edit mode for the device name.
SAVE BUTTON:
Saves Edition with new device names.
BUTTON NET:
Edits the IP number or Host.
REFRESH BUTTON:
Refresh page; If necessary when using different phones simultaneously.
How it works:
The Android phone and ESP8266 connect to the router via WiFi in the ESP 8266 output pins, we have on a board of relays which in turn is connected to the grid with numbered relays connected to the devices you wish to control.
When for example we press a button connect a device, the APP. Android sends data to ESP8266 board, it receives the data and takes decision to send the command to turn on the corresponding relay and returns data to the APP. Android that will trigger the key and corresponding status indication.
See the Blog: http://sergioarduino.blogspot.com.br/p/nodemcu-esp8266.html
Code for free ESP8266;
Step by step installation with pictures of the JPA;
Downloads screens and installations;
Wiring using LEDs or module with relays;
Examples of applications;
Step by step with WiFi router also for internal or external network;
See the blog and see how it is very easy to assemble, install and run!
Blog: http://sergioarduino.blogspot.com.br/p/nodemcu-esp8266.html
The Internet of Things is a technological revolution in order to connect electronic devices used in everyday life (such as electrical appliances, kitchen appliances, industrial machinery, transport means, etc.) to the Internet.
Automation control up to 9 channels for drive modules with relays, so we can control ON / OFF devices connected to mains 110V / 220V.
Allows WiFi connection between multiple simultaneous cell; View all operations performed by other cell (connected to the WiFi network that have the APP "ssid" and "password".) In real time, family use:
downloads:
Code: NodeMCU ESP8266 WiFi IOT Automation
https://www.dropbox.com/home/NodeMCU%20ESP8266%20WiFi
% 20IOT% 20Automation
Arduino Home
https://www.arduino.cc/
Librari: ESP8266WiFi
https://www.dropbox.com/home/ESP8266WiFi
Driver: CH340G
http://www.arduined.eu/tag/ch340g/
Blog: http://sergioarduino.blogspot.com.br/p/nodemcu-esp8266.html
App description. NodeMCU ESP8266 WiFi IOT Automation
ON / OFF control 110 / 220V up to 9 (nine) editable devices:
Through the smartphone Android with App. Installed, we can make the connection via WiFi with NodeMCU ESP8266 which in turn is connected to WiFi Router.
BUTTON - SWITCHES MODE:
- 9 keys control ON / OFF Mode Relay 110 / 220V;
- 9 Editable devices;
- 9 Status of IO ESP8266 doors;
BUTTON LOCK / UNLOCK:
Lock / unlock Edit mode for the device name.
SAVE BUTTON:
Saves Edition with new device names.
BUTTON NET:
Edits the IP number or Host.
REFRESH BUTTON:
Refresh page; If necessary when using different phones simultaneously.
How it works:
The Android phone and ESP8266 connect to the router via WiFi in the ESP 8266 output pins, we have on a board of relays which in turn is connected to the grid with numbered relays connected to the devices you wish to control.
When for example we press a button connect a device, the APP. Android sends data to ESP8266 board, it receives the data and takes decision to send the command to turn on the corresponding relay and returns data to the APP. Android that will trigger the key and corresponding status indication.
See the Blog: http://sergioarduino.blogspot.com.br/p/nodemcu-esp8266.html
Code for free ESP8266;
Step by step installation with pictures of the JPA;
Downloads screens and installations;
Wiring using LEDs or module with relays;
Examples of applications;
Step by step with WiFi router also for internal or external network;
See the blog and see how it is very easy to assemble, install and run!
Blog: http://sergioarduino.blogspot.com.br/p/nodemcu-esp8266.html
Category : Tools
Related searches